Professional Car Stereo Installers Near You
You're looking for a shop that designs appropriate gain structure, matches impedance, and maintains OEM features without noise or DTCs. Search for certified installers who deaden doors, build robust baffles, and use OEM-grade harnessing, fused distribution, star-grounding, and separated power/signal runs. Give priority to head units with both wired and wireless CarPlay/Android Auto, 4-5V preouts, and DSP for time/phase alignment. Look for itemized quotes, documented warranties, and RTA-based tuning. If you're located in Murfreesboro, the upcoming sections outline trusted options and what to expect.
Critical Points
- Choose shops that provide proper system design, clean wiring, and workmanship warranties of at least 12 months.
- Validate experience with your vehicle: CAN-bus integration, steering wheel controls, cameras, and OEM amp retention.
- Request itemized quotes separating hardware, labor, wiring, deadening, DSP tuning, and integration modules.
- Confirm technicians use fused distribution systems, appropriate gauge wiring, star grounding configurations, and noise-reducing cable routing.
- Inquire about scheduling, parts readiness (harness, dash kit, interfaces), and documented tuning/firmware support after install.
Why Professional Car Stereo Installation Matters
Even when you're handy with tools, professional car audio installation guarantees proper system design, clean integration with factory electronics, and reliable performance. You obtain correct impedance matching, proper gain structure, and time alignment that maintains stereo imaging. A certified installer evaluates frequency response, removes ground loops, and routes power and signal cables to minimize noise floor and alternator whine. They interface with CAN-Bus, A2B, or MOST networks using the correct data adapters, so steering wheel controls, OEM chimes, and telematics remain intact.
Professionals construct mounting baffles, dampen panels, and adjust DSP for your car's acoustics. They safeguard dash aesthetics with meticulous trim work, factory-quality harnessing, and secure terminations. You prevent parasitic draws, airbag interference, and warranty headaches while enhancing mobile audio performance and system longevity.
Examining Your Vehicle's Audio Demands
Initially, establish your listening goals and constraints, then map them to your vehicle's platform. Determine whether you prioritize bass response, vocal clarity, or wide soundstage. Audit the cabin: note factory speaker placements, driver sizes, mounting depths, and door materials. Analyze acoustic imaging by reviewing tweeter aim, seating positions, and reflective surfaces like glass and hard trim. Measure available power from the OEM amplifier or head-end, and establish impedance loads to prevent mismatch.
Evaluate ambient noise levels: engine, road, and tire frequencies dictate damping needs. Confirm charging system headroom-alternator output and battery condition-if you intend higher current draw. Determine integration approach: line-level adapters, DSP with summing, or full rewire. Set a realistic budget and timeline in line with your goals, installation complexity, and upgrade phases.
Choosing Head Units That Include Bluetooth and Apple CarPlay/Android Auto
When picking a head unit with Bluetooth and Apple CarPlay/Android Auto, you'll need seamless smartphone integration for hands-free operation, app mirroring, and minimal-latency connections. Emphasize audio quality with high-voltage preamp outputs, strong DACs, lossless codec support (including AAC/aptX HD), and flexible EQ controls/time alignment. Validate vehicle compatibility, steering wheel control retention, and fitment (whether single-DIN or double-DIN), and arrange for proper harnesses, CAN bus interfaces, and GPS antenna/microphone installation.
Seamless Smartphone Integration
When enhancing your automobile's audio, emphasize a head unit that natively supports Bluetooth hands-free and streaming, plus Apple CarPlay and Android Auto for application-driven control. You'll obtain voice-controlled navigation, messaging, and music with original equipment manufacturer-style ergonomics and minimal driver distraction. Opt for units providing both wired and wireless CarPlay/Android Auto, swift boot times, and responsive capacitive touchscreens.
Confirm dual-band Wi‑Fi and reliable Bluetooth codecs for steady performance. Ensure Qi wireless charging capability, steering wheel control functionality, and rear USB ports with ample amperage for rapid charging. Arrange here app shortcuts on the home screen for quick access to maps, calls, and playlists. Ensure a low-noise microphone placement and clean harness integration. When fitted professionally in Murfreesboro, you'll enjoy seamless pairing, reliable updates, and consistent in-dash performance.
Sound Quality Factors
Dial in sound quality by selecting a head unit that treats Bluetooth and CarPlay/Android Auto as signal paths, not afterthoughts. Seek out Bluetooth 5.x with high-bitrate codecs (aptX Adaptive, LDAC) and strong antenna design to minimize packet loss. For CarPlay/Android Auto, prioritize low-jitter USB interfaces and high SNR DACs (24-bit, >100 dB). Pick units with premium signal processing: adjustable crossover slopes, time alignment, parametric EQ, and phase control to improve speaker placement and staging. Make sure preamp outputs deliver 4-5V for better gain structure and enhanced noise isolation downstream. Assess chassis damping and shielding; quality acoustic materials and layout decrease EMI and vibration-induced artifacts. Check firmware support for sample-rate integrity and gapless playback to preserve dynamic range and imaging.
Installation and Compatibility
Before purchasing a head unit, chart your vehicle's integration points and validate protocol support. Confirm CAN bus interface needs, steering wheel control retention, and factory amp turn-on specifications. Check Bluetooth profiles (A2DP, HFP, AVRCP) and ensure certified CarPlay/Android Auto over USB or wireless, matching your phone and OS versions.
Confirm wiring compatibility with ISO/DIN harnesses, aerial adapters, and rear camera signal formats. Verify speaker impedance across OEM drivers; mismatches can trigger protection circuits or cause distorted sound. If you plan to keep an OEM amp, validate low-level RCA outputs and correct voltage levels. Set up DSP routing, time alignment, and crossover management within the head unit.
Assess chassis depth, ventilation clearance, and double-DIN fitment. Update firmware prior to installing. Complete a clean powerand ground run, fuse within 18 inches, and test prior to reassembly.
Amplifiers, Subwoofers, and Speaker Upgrades
Boost your system's overhead capacity and clarity with a properly matched amplifier, subwoofer, and speaker upgrade adapted to your vehicle and listening goals. You'll detect tighter transients, lower distortion, and cleaner dynamics when amplification corresponds to speaker sensitivity and power handling. Opt for Class D for efficient multi-channel or mono applications; ensure stable impedance and adequate current delivery. For subs, emphasize enclosure volume, tuning, and Bass alignment to attain linear response and controlled cone motion. Component speakers with high-quality crossovers improve imaging and off-axis performance; opt for materials that resist thermal compression and breakup modes. Set gains with an oscilloscope or distortion detector, ensure phase coherence between front stage and substage, and apply time alignment for a cohesive soundstage. Properly executed, upgrades produce impressive, accurate, and reliable performance.
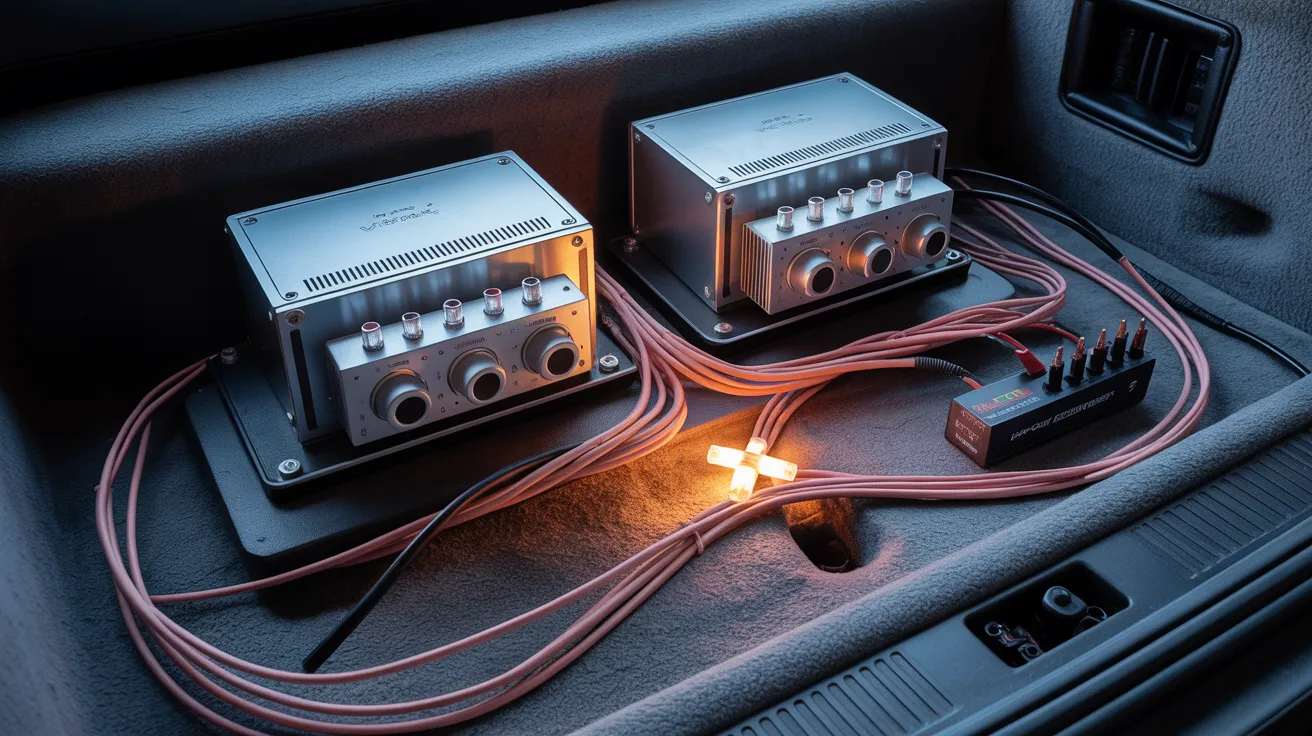
Wiring, System Integration, and Maintaining Factory Features
You require clean, secure wiring with suitable gauge, strain relief, and loomed runs to stop noise, shorts, and service issues. We work with OEM data buses using car-specific harnesses, CAN/LIN interfaces, and premium adapters to keep steering wheel controls, warning chimes, and factory amp logic. With the right modules, you keep features like backup cameras, OEM microphones, and retained accessory power while achieving seamless OEM integration.
Clean, Protected Wiring
Even though new stereo systems promise better sound and options, the real performance originates from clean, stable wiring that's correctly integrated with your vehicle's electrical architecture. You'll stop noise, voltage drops, and intermittent faults by routing conductors with organized harnessing, using protective loom, and maintaining proper strain relief. Terminate with professional-grade terminals, heat-shrink every splice, and keep enclosed junctions reachable for maintenance without visual clutter.
End power at a fused distribution point sized for load requirements and cable size. Ground to bare, paint-free chassis with star washer fasteners and validate resistance via DMM. Keep separate low-level signal paths from high-current paths to decrease EMI. Employ CAN-safe T-taps only where required, and label every electrical circuit. To conclude, torque battery connections to specification and confirm operation with a load test.
Factory Feature Retention
Since modern vehicles route audio, data, and controls over CAN, LIN, and MOST networks, proper factory feature retention relies on using the right integration modules and harnesses that translate OEM protocols to your aftermarket head unit without breaking diagnostics. You'll verify vehicle topology, identify the gateway, and select an interface that maps steering-wheel commands, backup sensors, and HVAC data. Program the module with the correct firmware, then terminate to ISO or aftermarket pinouts using shielded twisted pairs where specified to retain controls and audio quality.
You'll also retain telematics by passing through factory microphones, SOS circuits, and chimes via data-compatible chime modules. Keep load on amplified systems with CAN-enabled amplifiers or load resistors. Adjust ignition, illumination, and RAP triggers, then check DTC-free operation with a scan tool.
Smooth OEM Implementation
After factory features have been mapped and validated, smooth OEM integration emphasizes clean wiring architecture, proper bus interfacing, and retaining every OE function. You'll find harnessing performed with OEM-color matching, proper gauge selection, and secure terminations using crimp-and-solder methods or OEM-spec terminals. We interface with CAN/LIN/MOST bus networks via data modules, translating commands for steering-wheel controls, factory amplifiers, and telematics without lag.
We optimize signal paths to maintain ANC and adaptive noise systems, stopping phase conflicts or feedback. You'll preserve fader, balance, chimes, and safety prompts through DSP routing and properly-matched resistive networks. Firmware is updated for effortless syncing with Bluetooth, vehicle profiles, and cluster displays. Power and ground are segregated, noise floors evaluated, and grounds star-configured to remove alternator whine while maintaining diagnostics and warranty integrity.
Audio System Tuning and Calibration for Your Cabin
Even before you crank it up, you'll dial in your system's response to the cabin's acoustics with disciplined tuning and calibration. You'll begin with pink-noise measurement and an RTA to measure frequency response at the driver's seat. Then you'll establish time alignment for each speaker, set phase alignment between woofers, mids, and tweeters, and verify polarity with test tracks. Following this, you'll apply parametric EQ for narrowband issues and shelving filters for tonal balance, emphasizing minimal filter count to preserve headroom.
You'll set crossover points and slopes to handle overlap and reduce lobing. Utilize subwoofer delay to lock LF summation with the front stages. Finish with light room correction to address cabin gain and flutter echoes. Create multiple presets for driver-only, passenger, and top-down configurations.
Financial Planning: Expenses, Options, and Benefits
Start by framing your budget around system targets, vehicle platform, and integration complexity. Establish output targets (RMS wattage, signal-to-noise ratio), sources (head unit vs. DSP + OEM retention), and speaker topology (component vs. coaxial). Request budget itemizations that separate hardware, installation labor, integration modules, wiring, deadening, and tuning. In Murfreesboro, entry packages typically package a mechless head unit, basic speakers, and harnessing; mid-tier includes a DSP/amp, components, and deadening; premium includes high-current amplification, substage, active crossover networks, and calibrated tuning.
Utilize feature comparisons to assess head-unit DACs, preout voltage, DSP channel count, and app-based tuning. Verify quotes for line-item labor (fabrication hours, calibration), vehicle-specific interfaces (CAN/iDatalink), and warranty terms. Emphasize signal integrity, thermal headroom, and future expandability to enhance long-term value.
Installation Schedule and What to Anticipate on Appointment Day
The budget and scope you've set determine expectations about how long the setup process will take and what occurs the day you arrive. Anticipate that we'll examine your appointment checklist, confirm vehicle VIN, trims, and existing head unit, then verify parts: dash kit, harness, CAN interface, antenna adapter, and amp integration modules. For arrival logistics, park in the designated bay, clear out valuable items, and ensure the fuel door remains accessible if a battery support unit is used.
Standard timeframes: basic head unit swap, 60-90 minutes; head unit with wheel-mounted control preservation and backup cam, 2-3 hours; DSP/amp with sub wiring and Big 3 upgrade, 4-6 hours. We'll perform preliminary checks, battery float, panel removal with trim tools, impedance testing, signal routing, coding/firmware updates, reassembly, and a final functionality test-drive.
Guarantees, Support, and Expansion Options
You'll need clarity on factory and installer warranties-coverage of parts, labor conditions, and transfer options-so you have clarity on what's protected post-install. We'll detail aftercare practices such as firmware updates, tuning checks, and connector inspections to maintain system performance and preserve warranty validity. We'll also chart upgrade paths and add-ons-DSP integration, multi-amp expansion, substage upgrades, and OEM-retention modules-so you can scale your system without rework.
Manufacturer and Shop Warranties
Even top-quality head units and amplifiers can fail, so it pays to understand how manufacturer and shop warranties function in tandem, plus what they mean for aftercare and future expandability. A manufacturer warranty typically covers flaws in materials or firmware for a set term (usually 1-3 years), dependent upon proof of purchase and proper installation. It does not cover incorrect wiring, thermal abuse, or water intrusion. A shop warranty covers craftsmanship-terminations, solder joints, fuse sizing, impedance matching, and integration with OEM harnesses-usually 12 months, sometimes lifetime on labor.
You need to obtain documentation listing covered components, labor rates, RMA processes, turnaround times, and whether diagnosis fees are waived. Confirm transferability, parts availability, and authorized-service status. When both the warranties from both the manufacturer and shop are valid, you minimize downtime and the risk of out-of-pocket repair costs.
Enhancement Options and Additional Features
Though your current install should sound impressive from the start, strategic planning establishes a clean upgrade path that preserves warranties intact and minimizes rework. Consider modular components, ISO harnesses, and T-harness integration to preserve factory wiring and preserve OEM features. Choose head units with multiple preouts, DSP capability, and high-voltage RCA to support future amps and sub stages.
Incorporate Bluetooth adapters, backup cameras, and LED lighting using fused distribution blocks and CAN-safe controllers. Choose amplifiers with pass-through RCAs, selectable crossovers, and adequate headroom. Use load resistors or interfaces to avoid CAN errors and airbag lights.
Record serial identifiers, firmware, and wiring diagrams for warranty claims. Arrange periodic tuning, firmware updates, and ground and battery checks. Prepare for alternator, Big 3 upgrades, and deadening ahead of escalating power demands.
How to Locate Reputable Car Stereo Installers in Murfreesboro
Commence by assessing installers through numerous reliable sources: MECP-certified shops found on the Mobile Electronics Association directory, local dealerships' trusted supplier lists, and high-volume independent retailers with dedicated installation bays. Verify feedback on Google and Yelp, but prioritize evidence of scope: CAN bus integration, OEM retention modules, DSP tuning, and fiber-optic MOST interfaces. Request information on scope-of-work documentation, panel removal processes, torque specs, and use of non-marring tools.
Call out Independent installers and Mobile specialists who deliver in-bay calibration, RTA measurements, and vehicle-specific harnessing. Verify liability insurance, warranty terms (labor and parts), and firmware update support for head units and amplifiers. Ask for before/after measurements, photos of loom routing, and fuse placement. Finally, check turnaround time, loaner policies, and post-install support, including re-tuning sessions after speaker break-in.
Popular Questions
Does Murfreesboro Technicians Offer Mobile, On-Site Stereo Installation Services?
Yes, numerous local shops offer this service. You can locate mobile installers who arrive at your residence or workplace, equipped for in-place wiring, head unit integration, and CAN bus-safe connections. They take care of power distribution, fuse protection, speaker impedance matching, and OEM interface retention. You schedule, they verify beforehand your vehicle, arrive with harnesses, dash kits, and test gear, then bench-test, program, and calibrate. Expect correct loom routing, secure grounds, firmware updates, and clean, warranty-backed workmanship.
Can I Book Evening or Weekend Appointments for Installation?
Certainly. The majority of shops offer evening availability and weekend scheduling to match your schedule. When booking, specify your ideal time frame and vehicle information like make, model, and trim to ensure the right installer and harness kit. Request information on lead times, off-peak pricing, and any mobile add-on. Confirm service bay access, power requirements, and firmware update needs for head units, CAN bus interfaces, and amplifiers. You will obtain a confirmation with ETA and scope of work.
Do You Need to Consider Local Noise Ordinances During System Demos?
Indeed. You need to observe local noise ordinances when performing system demos. Control speaker volume to remain below posted decibel limits, especially in residential zones and after quiet hours. Pick a compliant demo location—commercial zones, controlled bays, or sound-treated spacesto reduce nuisance and citations. Use an SPL meter to check dB levels, keep bass transients under control, and limit demo duration. If mobile, idle in neutral sites and avoid running sub-bass sweeps near homes, schools, or hospitals.
Do Shops Make Loaner Vehicles Available During Extended Installations?
Yes-a few do, but this varies depending on policy and liability considerations. You'll notice certain shops offering limited loaners or rental partnerships, while others provide shuttle transportation within a designated service zone. Inquire about proof-of-coverage requirements, mileage limitations, and fuel policies. For extended projects-DSP calibration, custom fabrication, or total electrical rewire-confirm lead times, availability timeframes, and release of liability documents. If loaner vehicles don't exist, request reduced-rate rentals or ride-sharing credits included in your service order.
What Payment Plans or Financing Options Are Available Locally?
You'll usually discover in-house financing, third‑party providers such as Synchrony, and "buy now, pay later" providers. Retailers provide Deferred Payments with 90‑day same-as-cash promotions, zero‑down payment options, and graduated interest plans based on credit history. You can split parts, service, and tuning into fixed monthly installments, configure automatic payments, and prepay with no penalties. Ask about setup fees, APR after promo, minimum purchase requirements, and soft‑pull pre-approval to bypass hard inquiries prior to committing.
Conclusion
In the end, you're testing a basic principle: exactness delivers performance. When you spec the correct head unit, align RMS power, adjust crossovers, sound-treat doors, and integrate via CAN-bus without causing DTCs, you witness the proof. Dependable installs aren't luck-they're methodology: appropriate gauge OFC, fused distribution, solid grounds, calibrated DSP, and verified phase. You protect OEM features, maintain warranty, and obtain scalability. Pick trusted Murfreesboro pros, and your system will do more than play-it's going to measure, image, and endure.